Rediscovering our sculpture: an Art UK symposium

Looking forward to presenting at Art UK’s “Rediscovering our sculpture” symposium on 11th – 12th March 2021, via Zoom.

After working for 3 years as Photography Manager at Art UK on their sculpture project we, my job share partner (Jessie Maucor) and I, will be talking about the photography and photographic training applied during the project. Below is a brief description of the symposium and if you’re interested in joining please follow the link at the bottom.

Many thanks to the Russell-Cotes Art Gallery and Museum for the use of the banner.

The conference is the culmination of nearly four years work to digitise thousands of sculptures across the UK, held in collections and seen in our public spaces.

There will be talks from Art UK staff on sculpture digitisation, our learning and engagement programme and new sculpture discoveries through Art Detective. We will share best practice on photography of sculpture, running community engagement events and delivering innovative activities for schools.

Talks from curators, art historians and learning professionals will consider public sculpture, innovative learning programmes, diversity and colonialism, and new discoveries in sculpture and sculptor research. These include presentations from our project partners VocalEyesCultureStreet, the Royal Society of Sculptors and the Royal Photographic Society.

Rediscovering our sculpture: An Art UK symposium

Paestum

I recently had a great fortnight working in Paestum, in the province of Salerno, Italy.

Paestum was a Greek city on the coast of the Tyrrhenion Sea before being conquered, first, by the Lucanians and then the Romans. The city was abandoned in the early middle ages and was left forgotten until the eighteenth century.

The ancient city has three large Greek temples still standing and many other artifacts from its history with a museum, the Paestum National Archaeological Museum, dedicated to the city.

The modern town of Paestum is now a popular seaside resort, however during the winter months this becomes practically abandoned. These photographs contrast, or not, the differences between the modern and ancient Paestum.


Depth of Field

Introduction

The accepted way to determine Depth of field has not changed  for many years but with the progress of cultural heritage photography, and how that photography is viewed, it may well mean you need to give more thought to how you calculate it in the future.

How Depth of Field is calculated

Depth of field is calculated from the following formula:

d = 2NCD²/ f²

Equation 1.

Where:

N = f/number

C = circle of confusion

D = focus distance

f = focal length of the lens

The determining factor here is the circle of confusion (C), as the other 3 parameters will remain the same for any given shot.

Circle of confusion is taken as the maximum diameter a spot can be “blurry” but still appear sharp to the viewer and this is commonly determined with the viewer at a distance of 25cm viewing a print approximately 25 cm x 20 cm.

As an average person can determine around 100 points per cm at this distance (or 5 line pairs per mm), this approximates to a circle of confusion with a diameter of 0.2mm.

However this is the diameter of a blurry point that will appear sharp to us on print and it is from this that the circle of confusion that will be acceptable falling on the camera’s sensor is calculated.

For an example let’s look at a Canon 7D MarkII which has the following specifications:

Sensor Dimensions: 22.4 x 15mm

Pixel dimensions: 5472 x 3648 px

The enlargement required to produce a 25 x 20 cm print is given by the length of the print divided by the length of the sensor:

250mm / 22.4mm = 11.16 enlargement.

With the enlargement required we can calculate the circle of confusion by taking the required print circle of confusion, 0.2mm, and dividing it by the enlargement required. In the case of a Canon 7D Mark II, 11.16:

0.2mm / 11.16 = 0.018mm or 18µm

Now we have the circle of confusion required for our sensor to produce a sharp image viewed on our print the depth of field can be calculated.

To make things easy in our example we are going to use a 100mm lens, with an aperture of f/11 at a focal distance of 1m. If we put these figures into equation 1, we get:

d = 2 x 11 x 0.018 x (1000²) / 100²   =   39.6mm

Therefore the depth of field is 39.6mm from front to back in the scene that will appear sharp on the 25 x 20 cm print.

The Problem

The problem is that with the increased popularity of viewing “zoomed” images on screen the circle of confusion that would be acceptable with a depth of field of 39.6mm in our example will appear blurry when viewed at 100% on screen.

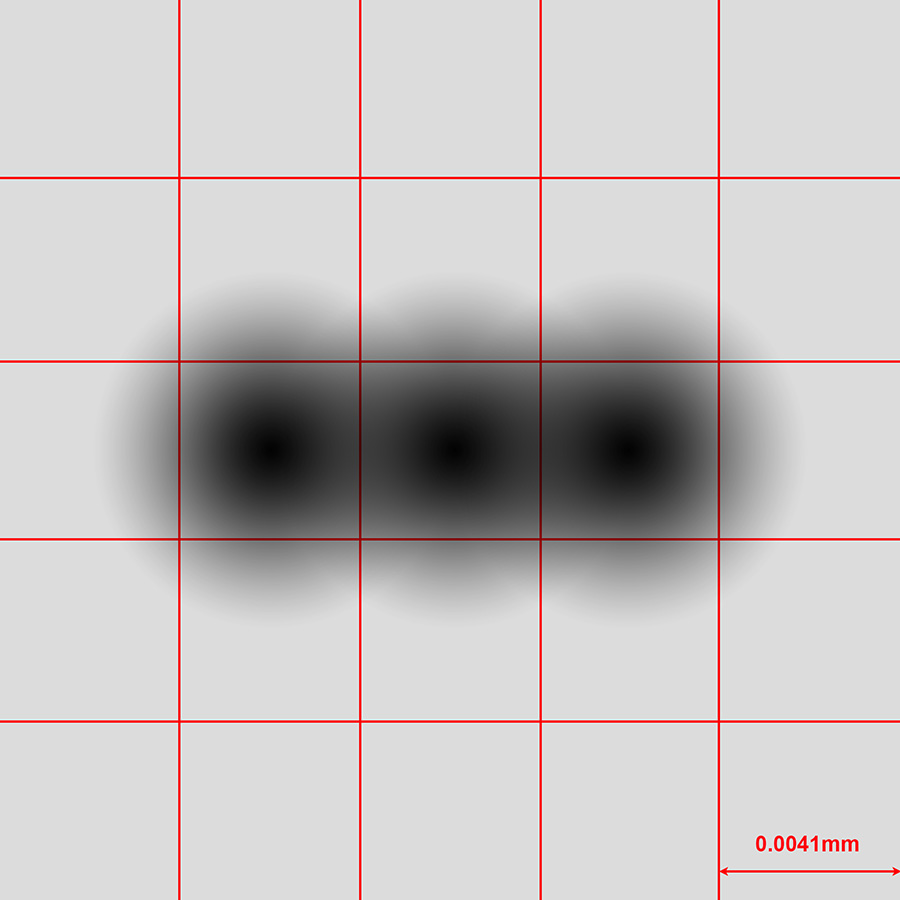
To demonstrate the problem take a look at the illustration below. This shows just how great an area a circle of confusion of 0.018µm diameter will be recorded on the sensor of the Canon 7D MarkII which has a pixel width of about 4.1µm.

18blur7d

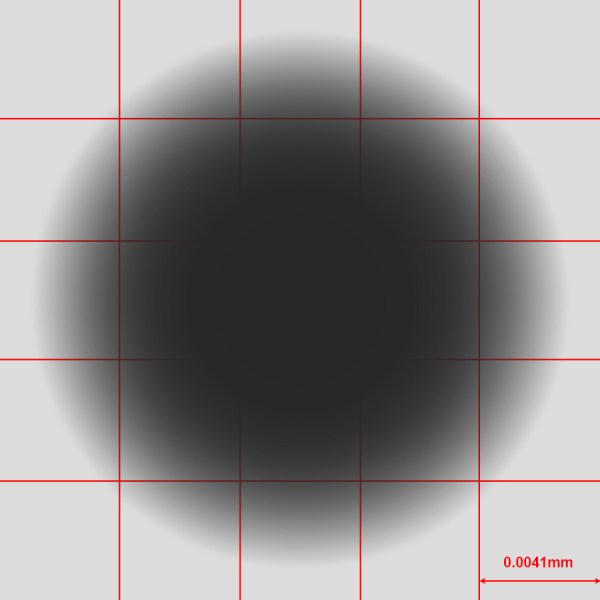
It is this circle of confusion that is usually used in the calculation of depth of field. What needs to be calculated is a circle of confusion that will provide a sharp image when viewed on screen at 100%.

Ideally a circle of confusion equal to the width of the pixel would provide the basis for the depth of field calculation.

4micrococ7dsensors

In this case the depth of field for the same shot as the example earlier becomes:

d = 2 x 11 x 0.0041 x (1000²) / 100²   = 9.02mm

Now the depth of the scene that will be in focus when viewed has reduced significantly from 39.6mm to 9.02mm, a difference of 30.58mm, or a 77% reduction.

For practical purposes a useful rule of thumb is to use a circle of confusion equivalant to double the pixel width on the sensor. In the case of the Canon 7D MarkII this would be 0.0082µm.

7dsensorx2pw

This would result in the following depth of field in our example:

d = 2 x 11 x 0.0082 x (1000²) / 100²   = 18.04mm

This results in a significantly greater depth of field than using the pixel width, 9.02mm, but still significantly less than using the more traditional calculation for the circle of confusion, 39.60mm.

Summary

depthoffieldno

  • The next time you look at the depth of field scale on your lens give some thought to how your image will be viewed. They may not be relevant.
  • As the pixel width decreases on the sensors to accommodate more pixels the acceptable sharpness and depth of field will be affected to a greater extent if the images are to be viewed at 100% on a display.

PICTURE THIS! – INTERNATIONAL CONFERENCE ON PHOTOGRAPHY AND VIDEOS IN MUSEUMS TODAY

museokuvaamineniii

Very pleased and honoured to have been invited as a keynote speaker at “Picture This! Photography and Videos in Museums today” in Helsinki on 24th and 25th November 2016, organised by the Finnish Museums Association, the Finnish National Gallery, and The Finnish Museum of Photography.

If you are interested or happen to be in Helsinki at this time please take a look at the link:

http://www.museoliitto.fi/picturethis

The abstract for my presentation is below and I’ll post the slides after the conference has taken place:

Challenging Museum Photography: Image Quality for Cultural Heritage
Drawing on 30 years experience in optimising photographic systems within the cultural heritage sector, at the National Gallery, London and latterly as a freelance photographer, this presentation will look at what photographic departments, photographers and museum professionals (who are responsible for photography) can do to ensure their photography is of the highest quality, whatever their budget. The presentation will look at how you can analyse your imaging systems, how work-flow structure can play an important role in improving your images and the challenges new technology has introduced.


Colour Management Procedure for 2D works

Attached are instructions for colour managing the photography of 2 dimensional objects such as books, paintings and maps.

Colour Management Workflow for Photography of Works of Art V3.1

The instructions are written for those on a limited budget and although they assume you have a camera that will provide a RAW output, that you have an X-rite SG chart and Adobe Photoshop they can be adapted for other equipment.

Firstly, if you do not have an SG chart, and I know many people won’t, you can run the process using the cheaper X-rite 24 patch chart.Picture 002

If you do use a 24 patch chart you will need to use different pixel values for the six grey patches when setting the tone values in section 3. These should now be:

243, 201, 161, 121, 85, 52

If you do not have a camera that outputs RAW files, out put as large a jpeg file as possible and go straight to section 4. Try and get as correct as exposure as possible.

And finally, if you don’t have a copy of Adobe Photoshop you can carry out section 3 using the cheaper Photoshop Elements.

Please take note that these instructions use generic colour values and may not be the values of your chart, If you want more accurate information to work with you’ll need to measure your chart with a spectrophotometer and upload your data to delt.ae. Also the colour values used here are for Adobe RGB (1998). If you are using a different colour space such as sRGB IEC61966-2.1 or any other you will need different values.

If this means nothing to you don’t worry you can investigate  later, you should still get pretty reasonable results.

I hope this is helpful and any constructive feedback or comments are more than welcome.

Cultural Heritage at the Lucie’s?

Hats off to Dave Clarke, former Head of Photography at the Tate Gallery and now Chair of the advisory board for the Lucie Awards www.lucies.org, for attempting to get acknowledgement of cultural heritage photography.

For far too long photography in the cultural heritage sector has been ignored in the wider photographic community and although organisations such as the Association for Historical and Fine Art Photography (AHFAP) in the UK and Imagemuse in the US have been very successful in promoting this work within the cultural heritage community it is about time the great work carried out, worldwide, is acknowledged by a broader peer group.

The cultural heritage photography has seen huge technical and creative advances in recent years with many new talented photographers entering the sector, whilst at the same time the standing of these photographers within their institutions has appeared to have diminished.

It’s about time the work of the cultural heritage photographer was recognised more widely.


2013 AHFAP UK Conference – Call for papers

The 2013 AHFAP UK Conference will be held on Thursday 14 November in the Starr Auditorium at Tate Modern, London.

Innovating out of Austerity

For the first time, the conference will have a broad theme, and this year it is ‘Innovating out of Austerity’. We have now had three years of austerity, so how are image-makers in the UK cultural heritage sector adjusting to these changes, what new practices are being introduced and what innovations made?
The theme is not exclusive and papers on other topics and techniques relevant to our sector are equally welcome.
It is planned that the timetable will accommodate papers of 15-, 30- and 45-minute durations. Please submit your proposals to info@ahfap.org.uk by Monday 30 September.

For further information and to book a place at the conference see http://www.ahfap.org.uk/conferences/2013-uk-conference/

“5:15pm is a regular kick-off time in the football calendar”

So say the Football Association in response the Manchester City and Wigan Athletic fans who won’t be able to travel home by train that day if they stay to the end of the game and would like the match scheduled earlier in the day. It drew me back to a picture, below, I took a couple of months ago, just testing out some lights lamenting the demise of the traditional 3 o’clock kick-off. I decided to take the picture as I was fed up with my team, West Ham United, playing at odd times and never being quite sure when they were playing next.

Traditional 3 o'clock football kick off
Traditional 3 o’clock football kick off time.

So I apologize to the Football Association for forgetting that 5:15pm is the “regular” kick-off time and at the earliest opportunity I will retake the picture with the correct time.

%d bloggers like this: